
Charging a 2nd battery in my car boot while driving.
This method leaves you with two permanently connected battery clamps in the boot, with a fuse that can be removed to isolate the positive clamp when no battery is fitted. A neater alternative is to use a connector that allows the clamps to be removed. I personally prefer the permanently connected leads, as it means I can't lose them.
Parts (Try the Oddpak stand at Halfords or Maplins).
An in-line blade fuse holder
A 15 amp blade fuse
Some 17.5 amp automotive electrical cable
A set of battery clamps - preferably 'quick release' ones (try Maplin
Electronics or your local caravan dealer for these.)
Scotchlock connectors (or an alternative if you don't like Scotchlocks)
Depending on the type, female spade connectors may be required to
connect to the in-line fuse holder.
12 volt buzzer or sounder (optional) - the louder, the better.
12S 2 core extension cable - (from caravan dealers.)
Note: while a 'moulded on ' socket end is fine, you're going to be modifying the wiring inside the plug, so make sure that it's going to be possible to open up the plug and swap the wires around.
Tools:
Assorted screwdrivers (for removing boot trim)
Pliers or preferably mole grips (for the Scotchlocks)
Wire cutters / strippers
Crimp tool for the spade connectors (if required)
Drill and metal bit (if you plan to drill a ventilation hole)
Wiring:
It's probably best to use 17.5 amp cable and a 15
amp fuse. I normally prefer to use 27.5 amp cable and 25 amp fuses
for battery charging , but as you're tapping into the existing 12S
wires, you're limited by the current that they can handle anyway.
First you'll need to find out where the 12S cable enters the car body
- it'll probably be behind one of the trim panels in the boot although
if you're lucky, you might be able to get at it just by lifting the
carpet.
Make sure you have the 12S cable (grey outer insulation) not the 12N
(black outer insulation). If in doubt, you'll need to follow the wires
- if more than one of them goes to the tail lights, then you've found
the 12N instead. If you find both 12S and 12N feeds but can't see
the outer insulation, the 12S is the one with the thicker wires.
For the positive connection:
Connect a length of wire to the blue wire of the 12S cable. Connect the other end to one terminal on the fuse holder. Connect the fuse holder's other terminal to the positive (red) battery clamp.
For the negative connection:
Connect the negative clamp (usually blue) to a suitable earthing point on the car body using another length of wire.
Fitting the battery:
The battery needs to be secure so that it can't tip
over. I used to have mine secured with cut down roof-rack straps,
but I now keep it in a collapsible plastic crate (from B&Q) wedged
in place with some of the other junk that's usually kicking around
the boot. The straps I used were nylon ones, and tended to fray once
cut - they can be heat sealed by applying a flame to the freshly cut
end.
Ideally, you should drill a hole somewhere in the boot floor and feed
the battery vent tube through it - this eliminates the risk of explosive
hydrogen gas building up in the boot. My boot appears to be ventilated
anyway, so I haven't bothered. If you do drill the hole, take care
not to drill though anything important (such as the fuel tank!)
The cable:
You can take the battery out of the boot to use it,
but this is a major headache.
Far better is to buy a good quality 12S extension lead (make sure
it uses thick 2 core cable) open up the plug and connect the wire
that goes to pin 4 up to pin 2 instead. With this cable inserted,
the caravan's 'car' feed will be from the leisure battery. Without
the extension, the feed will be from the car battery as usual.
'Drive away' warning: (optional):
Note: Pin 5 on the 12S is normally unused - identify the brown wire on the 12S and follow it (or pull it gently) to find the free end. If it isn't connected, then you can use it for the warning buzzer.
If pin 5 is in use (unlikely) and you have a pre-1999
caravan, you might consider doing the same with pin 7 (the black wire
on the 12S)
Using a short length of wire, link pins 5 and 6 in the plug of the
extension lead. Connect the brown 12S wire to one of the leads of
the buzzer. Connect the other lead from the buzzer to an earthing
point on the vehicle.
The buzzer will now sound if you ever start the engine with the extension
lead still fitted. In use, it's probably best to keep the boot battery
disconnected (fuse removed) when the 'van is actually hitched, otherwise
you're charging the two batteries in parallel, when you really want
to top up the one in the 'van. When solo, connect up the battery and
insert the fuse.
Be sure to remove the fuse whenever you don't have the battery in
the boot, in case the positive connector shorts against something.
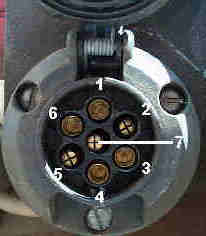
| 12n Socket: |
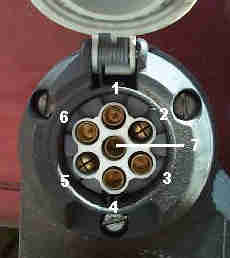
12s Socket:
|
| Feedback | About |
 Follow this site on FaceBook